
Sunday, December 15, 2013
All This Stuff
I love doing craft shows and art fairs. I love meeting people. People are so interesting. I watch people walk by, notice their expressions on their face, and wonder what they're thinking about as they look into the different booths. One thing that surprises me, though, is the number of times people that walk into my booth, look around, then ask me "Do you make all this?". I reply "Yes, every bit of it (well, there are exceptions to that rule, but that's another story)". I think people assume that, since there is so much on display, I couldn't possibly have made all of it and perhaps I'm a representative from one of the direct sales companies such as Premier Designs or Silpada. No, I'm not selling some mass-produced line of jewelry. I'm selling jewelry that I pored my heart and soul into. This isn't my hobby, this is my WORK. I work in my studio for hours every day making jewelry, often to the point of neglecting my family. I'm in the studio working when I should be cooking a home-cooked dinner for my husband. I find every excuse there is to slip off to my haven and work. So yes, I make all this, and yet there's still so much more inside me to make.
Wednesday, October 16, 2013
Jewelry Design Revisited
Jewelry design is an ever-evolving art. As artists, we are constantly honing our skills and learning new ones. Often times we come across a piece of our earlier work and realize it needs a little updating. Sometimes this task is somewhat bewildering. After all, when I first designed the piece, I thought it was perfect. Why is it less than perfect now?
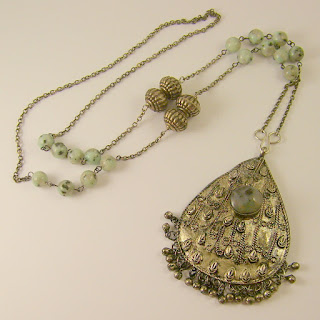
I recently pulled out some of these older pieces to re-think their design. I realized when I initially made these, I really wasn't doing much wire work, mostly just stringing. These pieces, although lovely, just look too heavy for today's styles. Now days jewelry has a lighter, airier feel, and that's perfect for wire-work. Wire just naturally has a way of making jewelry look effortless. So I re-worked the pieces by wire-wrapping the beads, and I love how they turned out. Plus it was so much easier because I already had all the beads I wanted to incorporate from the previous necklace, they just needed to be re-arranged.
I recently pulled out some of these older pieces to re-think their design. I realized when I initially made these, I really wasn't doing much wire work, mostly just stringing. These pieces, although lovely, just look too heavy for today's styles. Now days jewelry has a lighter, airier feel, and that's perfect for wire-work. Wire just naturally has a way of making jewelry look effortless. So I re-worked the pieces by wire-wrapping the beads, and I love how they turned out. Plus it was so much easier because I already had all the beads I wanted to incorporate from the previous necklace, they just needed to be re-arranged.
| Fiesta Star Lampwork Bead Necklace - | |
| Before: | After: |
 |
 |
| Maple Jasper and Turquoise Beaded Necklace - | |
| Before: | After: |
 |
 |
Saturday, October 12, 2013
Lampwork Bead Give-away
Carol Evans (cevansdesigns.com), a fellow jewelry designer and also an awesome lampwork bead artist, is having an incredible giveaway. Every month she's sending 8 different jewelry designers a batch of her lampwork beads. I received my beads a couple of days ago and I knew when I saw them that I wanted to incorporate camel bone in the design because 1) the lampwork beads have the same beige color, and 2) I have a ton of camel bone beads to use up.
 Here's my tub of vintage camel bone:

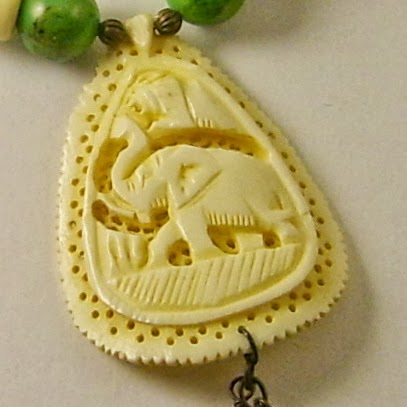
Originally I had planned on wire-wrapping this large camel bone bead as a focal pendant with a lampwork bead and some pearls dangling from the bottom, but it wasn't meant to be. Apparently when the hole was reamed out, it isn't made very straight.

No matter how hard I tried, I could not feed the wire through the hole of the bead. So, off to plan B. I pulled out the rest of the vintage camel bone and found this pretty pendant. I couldn't attach the lampwork bead dangles, but this will work well.

I just listed the necklace/earring set and matching bracelet on etsy :-)


Originally I had planned on wire-wrapping this large camel bone bead as a focal pendant with a lampwork bead and some pearls dangling from the bottom, but it wasn't meant to be. Apparently when the hole was reamed out, it isn't made very straight.

No matter how hard I tried, I could not feed the wire through the hole of the bead. So, off to plan B. I pulled out the rest of the vintage camel bone and found this pretty pendant. I couldn't attach the lampwork bead dangles, but this will work well.
I just listed the necklace/earring set and matching bracelet on etsy :-)


New Website
A little over 9 years ago I wanted to purchase a domain name for my business, but the .com wasn't available at that time so I had to buy a .biz. I didn't get much traffic on the site, so after I opened my etsy store, I re-directed the URL to point to my etsy store. Things were going along pretty well. About a year ago I was notified that the .com domain name was now available so I purchased it. I created my website and let it run for a couple months. The new site was still receiving very little traffic, so again I re-directed the URL to point to my etsy store since etsy gets a ton of traffic.
As I recently posted, etsy has changed some of their rules. Etsy was originally founded on the principal of buying and selling handmade items, but over the past couple of years some etsy stores were selling mass-produced products made in China. Etsy apparently is going to continue to allow this, provided the store files an application to work with a manufacturer. Needless to say many etsy sellers are not at all happy about this and are jumping ship. One of my fellow SRAJD members recommended not having all your eggs in one basket (meaning etsy), so I am taking this as an opportunity to rebuild my website. I hope everyone will check it out - www.beadifulworld.com. I'll gradually be adding more and more items to the site.
As I recently posted, etsy has changed some of their rules. Etsy was originally founded on the principal of buying and selling handmade items, but over the past couple of years some etsy stores were selling mass-produced products made in China. Etsy apparently is going to continue to allow this, provided the store files an application to work with a manufacturer. Needless to say many etsy sellers are not at all happy about this and are jumping ship. One of my fellow SRAJD members recommended not having all your eggs in one basket (meaning etsy), so I am taking this as an opportunity to rebuild my website. I hope everyone will check it out - www.beadifulworld.com. I'll gradually be adding more and more items to the site.
Wednesday, October 2, 2013
etsy Sells Out
Yesterday (October 1, 2013), etsy notified their sellers that they have been screwed. They did it in a very nice manner, with an email letting them know they have been screwed, a video explaining how the action of being screwed is really for everyone's good, etc.
According to the email, "Over the past eight years, Etsy sellers have astounded (us) with their creativity, ingenuity and ambition. This is a marketplace we make together; we lay the foundation and you build on it. You’ve grown Etsy in ways we never predicted, but part of our foundation hasn’t kept up."........That's true.
"Sellers tell us that our policies for shops with handmade items have become confusing, intrusive and restrictive. It’s time to give those policies a renovation."........True again.
And then the screwing begins. What we etsy sellers hoped to happen was for etsy to stop allowing many of their sellers to sell mass-produced items, primarily from China, and passing them off as handmade items. Those of us that make one of a kind items are truly what etsy was all about when it first began. Back in the early days they constantly stressed "Buy Hand-made"!!
Well, that's not at all what happened. Instead of etsy putting on their big-boy pants and telling these shop owners to cease and desist, instead they caved in to money. They don't care what is ethical, they just want the money these shops are bringing in. Hello???? In what sense of the word does "handmade" bring to mind Chinese sweat shops. I know my studio is only as big as a bedroom. There's no room for an assembly line in here!
So etsy wants us all to believe that this is for everyone's good. This is to allow shop owners to take responsibility for how their product is made and being honest about it. My question is how will these shop owners be forced to comply with this new guideline? I seriously doubt these shop owners will even take the initiative to apply.
In one of the Facebook groups I belong to, it's evident that people are not buying into this. Left and right people are scrambling to get their own website up and running, or move their listings to other venues such as ArtFire. I, too, am seriously considering abandoning ship. Etsy has been good to me as far as visibility goes, but with SO much competition on etsy, you can't also compete with ridiculously low priced items from China. It's like trying to set up a kiosk in the middle of Wal-Mart!
I may not leave etsy immediately, it's going to take a little while. I already have my own domain (beadifulworld.com) with a few items listed. I need to do some tweaking to make it more user-friendly, but this is a "heads up" to everyone that it's coming.
Wednesday, September 11, 2013
Transformation of an Earring Card
I have been using my vertical business cards for my earring cards for a couple of years. I absolutely adore my business cards, but it was finally brought to my attention that earrings get lost with the busy background of the card. Duh! I can't believe I didn't see that, I was so gaga over the cards. So I set out on an endeavor to re-invent my earring cards. This, I found out, was no easy feat.

I wanted to make the card simple enough to let the earrings be seen, yet still keep the look of my business cards. I contacted the person that designed my logo and found out that the font she used was no longer available, so that squashed the idea of starting from scratch. I knew I was going to have to somehow use existing cards. When I had my cards printed at Moo.com, I also had several of the mini-moo cards printed to use as a hang tag for necklaces, bracelets, etc. I determined that if I could find a way to use the mini-moo card in the design, I'd have the best of both worlds.
This is my mini-moo. It looks like a small business card only longer.

Here's what I did:
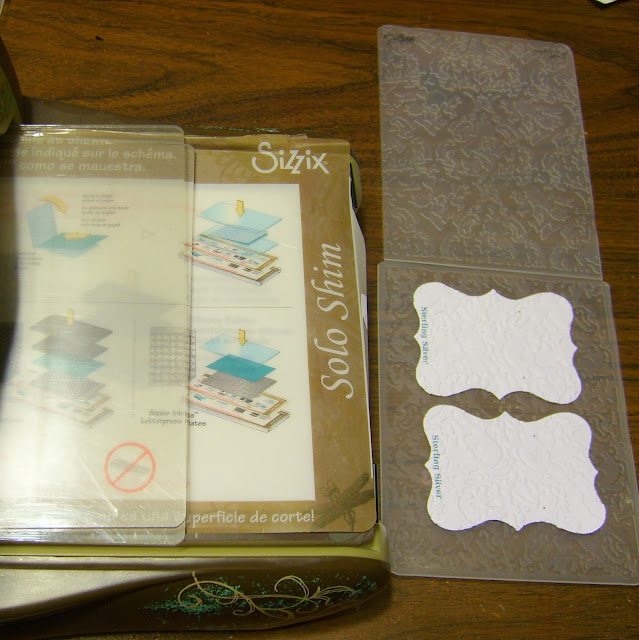
I purchased a jumbo 3.5" craft punch at Hobby Lobby. I printed out "Sterling Silver" on white cover stock paper and then cut out the shape with the jumbo craft punch.

I inserted two of the white punched out pieces into am embossing folder and ran it through my Vintaj BigKick machine, embossing the punch with a pretty embossed design to give it some texture without adding color. I also printed my contact information on brown card stock for the back of the earring card.
I turned the white punch over and attached ultra-thin glue dots on the back (two on each of the bottom corners and one top center), then attached the back of the white punch to the front of the brown card stock, lining up the bottom and sides.
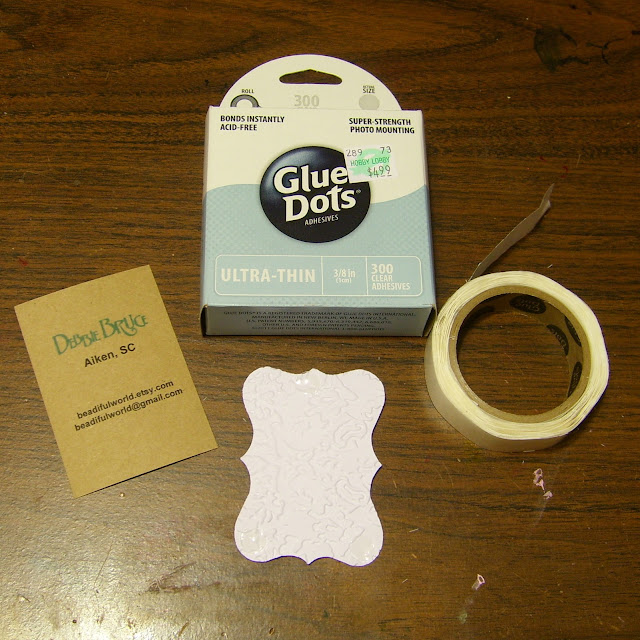
I applied two more glue dots to the top left and top right corners of the front of the earring card, attached one to the back of the mini-moo at the bottom edge of the mini-moo card, and placed it on the earring card, lining up the top and sides.


The mini-moo is longer than the earring card is wide, so I turned the earring card over and trimmed the part sticking out.

I attached an adhesive back earring adapter and Voila!! It has the look of my business cards, yet it's not too fussy so the earrings really pop.
 Thanks go out to my fellow SRAJD (Self-Representing Artists in Jewelry Design) for throwing around ideas, and especially to Shelly Owen and Jen Smith Fletcher for really giving me a push!

I wanted to make the card simple enough to let the earrings be seen, yet still keep the look of my business cards. I contacted the person that designed my logo and found out that the font she used was no longer available, so that squashed the idea of starting from scratch. I knew I was going to have to somehow use existing cards. When I had my cards printed at Moo.com, I also had several of the mini-moo cards printed to use as a hang tag for necklaces, bracelets, etc. I determined that if I could find a way to use the mini-moo card in the design, I'd have the best of both worlds.
This is my mini-moo. It looks like a small business card only longer.

Here's what I did:
I purchased a jumbo 3.5" craft punch at Hobby Lobby. I printed out "Sterling Silver" on white cover stock paper and then cut out the shape with the jumbo craft punch.

I inserted two of the white punched out pieces into am embossing folder and ran it through my Vintaj BigKick machine, embossing the punch with a pretty embossed design to give it some texture without adding color. I also printed my contact information on brown card stock for the back of the earring card.

I turned the white punch over and attached ultra-thin glue dots on the back (two on each of the bottom corners and one top center), then attached the back of the white punch to the front of the brown card stock, lining up the bottom and sides.

I applied two more glue dots to the top left and top right corners of the front of the earring card, attached one to the back of the mini-moo at the bottom edge of the mini-moo card, and placed it on the earring card, lining up the top and sides.


The mini-moo is longer than the earring card is wide, so I turned the earring card over and trimmed the part sticking out.

I attached an adhesive back earring adapter and Voila!! It has the look of my business cards, yet it's not too fussy so the earrings really pop.
 Thanks go out to my fellow SRAJD (Self-Representing Artists in Jewelry Design) for throwing around ideas, and especially to Shelly Owen and Jen Smith Fletcher for really giving me a push!
Monday, September 2, 2013
All in a Day's Work
No day off for me on Labor Day :<[ I had a long list of things to accomplish in the studio, but I seemed to have forgotten about one thing - my inventory reconciliation for the art gallery was due yesterday, and I hadn't even started, so of course that was first on my checklist. Sad thing is I found several discrepancies. Hopefully they'll still honor it and pay me for the missing items, even though I was technically one day late with my response.
My Lortone tumbler that I've had all of one week is going bye-bye. The seller on eBay said it was "gently used" - HA! I plugged it in and 4 minutes into the cycle and belt came off. My very handy husband took the cover off, put the belt back in place, tightened things up, yada yada... you get it. It ran for an hour with no problem. The next day I went to use it, and 3 minutes into it the same thing. Cover off, belt back on..... enough said. He said it could be that it's just worn out. How can a "gently used" item be worn out. It's going back to the eBay seller for a refund. Now to find a replacement as cheap!
I've been trying several new techniques, trying to narrow down my niche. However, this is not a very good place to be when you have a show in just under 4 weeks and you feel like you're scattered hither and yon with nothing much to show for it.
One of the things I'm experimenting with is different patinas on copper. Saturday I tried a technique using cedar ped bedding and vinegar that took FOREVER, so possibly I didn't prepare the metal correctly for it to adhere. More than 48 hours later, some of the items have very little patina. However, the focal part did turn out fairly decent.

Another design I'm playing around with is cigar band rings. I cut out an oblong shape of copper using my jeweler's saw, and after sanding, sanding, and just a little more sanding, I then embossed the metal with a cool design. I shape it into a ring, antiqued it in liver of sulphur and then ran it through my "now history" Lortone tumbler to work-harden the metal. The picture on the left is straight out of the tumbler, before polishing. The picture on the right has been somewhat polished (my arms got tired, will try more later).

Thursday, August 15, 2013
Good for the Soul
A couple of weeks ago I posted a message on Facebook that I was cleaning out my studio and had some boxes of beads that I no longer needed.

I had several responses, but the first one came from my best friend, Pam. She is very active with the Animal Advocates of Barnwell, SC to aid in rescuing, healing, safeguarding and giving new life to animals in need. One of the ways they raise money is through their "Pick of the Litter Shoppe". Income from POTL helps to fund various programs including their no cost/low cost spay neuter program.
The Animal Advocates are working with the Allendale Correctional Institute, where several of the inmates are making jewelry which is then told in the Pick of the Litter Shoppe. My friend Pam let me know that the inmates could definitely use the beads for their jewelry.
Today I received this email, forwarded by Pam, from Vikki, the President of Animal Advocates:
"Pam,
Please tell Debbie Bruce thank you for all of the beads she donated to ACI. The guys were so excited and told me to be sure and tell “the lady” that donated the beads thank you." Vikki took the boxes to them today, and she said you would have thought the boxes were filled with a million dollars…<3
I'm so thankful that my "trash" was another man's "treasure".
Saturday, August 10, 2013
A Little Bit of This, A Little Bit of That
Today has so far turned out to be a fairly productive day. I've spent bits and pieces of this week trying to come up with some earring designs. Today I hoped to see some finished results. Well......not so many results as I'd like, but headed in the right direction.
I drew a heart design for earrings, transferred the design to cardstock and cut it to make a template. I cut out four in copper. One set I embossed, then filed smooth, colored with alcohol ink and finally sealed with a matte coating.

These earrings have now been listed on etsy
I then took the other copper set and tried to solder a sterling silver design on the front. Well, that didn't work out so well. I need to brush up on my soldering skills :
The other pieces I've been working on were given a good cleaning in a pickle solution, then antiqued in liver of sulphur. So now I have a pile of dark black pieces that need to be polished, but I don't have the energy at this moment.
I also started playing around with photos on gradient paper which I obtained from a fellow SRAJD jewelry designer, Laura Bracken. These papers make jewelry photos much more interesting than a plain background. Here's a lanyard on the gradient paper:

Sunday, August 4, 2013
A Weekend of Praise
This weekend I've had very little time to spend in the studio. I spent a little time Saturday morning while I was waiting on granddaughter Emma to take a nap. Once she was well rested, Emma, my daughter Natalie and I drove over to Augusta for a day of shopping. I mostly tried to keep Emma pre-occupied while her mom shopped for birthday ideas. We then "tried" to eat dinner at Buca diBeppo, the new Italian restaurant at the mall, but the wait staff there didn't seem to thrilled to have another table to tend to (I think we even got the "eye roll" in addition to a very verbal "UGH") so off we went to our very friendly Macaroni Grill for a delicious dinner. Then it was grocery shopping for fruit, etc. for fruit trays for our church program Sunday night. I was exhausted when I finally got to bed, but slept like a baby :-)
Sunday was spent singing, singing, and then some more singing. Awesome worship service this morning, then back in the afternoon for a "Night of Epic Praise" when our choir and orchestra combined with First Baptist Columbia's choir and orchestra. We had approximately 278 people in the choir loft! Over 100 sopranos!!!

And the good news is WE GET TO DO IT AGAIN THIS WEEKEND at their church :-)
Friday, August 2, 2013
Studio Time !!!
I haven't really been up to being ultra-creative for the last few weeks. I had surgery eight weeks ago which required lots of rest and I wasn't allowed to lift anything heavier than a gallon of milk, so I figured I couldn't even get too involved in my studio since most containers storing beads are pretty heavy. This afternoon was the first time I've really felt like spending some quality time in my studio. I've been hammering copper (yes, my arms are now very sore since I haven't used those muscles in a while!), making some fancy sterling ear wires, etc. Tools are everywhere on my work table and I can't find a thing, but it's still a great feeling to be working again. Nothing is picture-worthy yet, but I will post some soon.
Wednesday, June 19, 2013
Modified Circular Brick Stitch Earrings
Recently I came across a pattern for this beautiful beaded pendant.

I tried using the pattern on large hammered teardrop pendants for a pair of earrings, but due to the rather large size of the teardrop, the beads would touch my neck which would cause the beads to curl. I knew this would never do. I was constantly reaching up to feel the earrings and see if the beads needed to be straightened out. This is one reason why I always try out new designs on myself before I make any to sell. I wouldn't want one of my customers dealing with curled up beads!
I still loved the concept, so I decided to take a different strategy. I used the design principle and inverted it to the inside of the pendant instead of the outside. Voila! I wonderful pair of earrings, still very large, and no curling beads :-)
 I've completed three pairs of earrings - these salmon/coral earrings, a green pair, and a pair with olive green/slate blue-gray, which are all listed in my etsy shop. I'm now working on a pair of fuchsia/pink. I think I'll wear them tonight!
Happy beading :-)

I tried using the pattern on large hammered teardrop pendants for a pair of earrings, but due to the rather large size of the teardrop, the beads would touch my neck which would cause the beads to curl. I knew this would never do. I was constantly reaching up to feel the earrings and see if the beads needed to be straightened out. This is one reason why I always try out new designs on myself before I make any to sell. I wouldn't want one of my customers dealing with curled up beads!
I still loved the concept, so I decided to take a different strategy. I used the design principle and inverted it to the inside of the pendant instead of the outside. Voila! I wonderful pair of earrings, still very large, and no curling beads :-)

Happy beading :-)
Saturday, March 30, 2013
National Craft Month Challenge: Day 30
Day 30 Challenge is to make a matching set. I mixed these gorgeous barrel-shaped fluorite in quartz beads with assorted fluorite beads, mother of pearl nuggets, etc. The color combination of this set makes me think of summer :-) This is the last day of the challenge. I'm thankful it's over, but is was fun and great motivation to do something every day :-)


Friday, March 29, 2013
National Craft Month Challenge: Day 29
Day 29 Challenge was to brighten your design by adding a pop of color. I saw a necklace in one of my favorite department stores, and this is my version of it. I had a box of these triangle beads that I've had for years, so this gave me the opportunity to use up some of them.


Thursday, March 28, 2013
National Craft Month Challenge: Day 28
Day 28 Challenge is to get those pliers out and create a wire wrapped bracelet. This is a brass cuff bracelet that I've wire wrapped with gold wire and assorted beads.


Wednesday, March 27, 2013
National Craft Month Challenge: Day 27
Day 27 Challenge is to make a mixed media masterpiece. I used several colors of nail polish to color the inside of these bezels, added resin, and strung them all on elastic cord separated by green magnesite beads.


National Craft Month Challenge: Day 26
Day 26 Challenge is to add the beauty of pearls to your jewelry design. I had a bracelet I made a few years back that needed some updating, so I took it apart (should have taken a photo first, duh!) and changed it up a little. The original had a lot more dark gray which may be why I wasn't crazy about it. Also each strand was a mixture of all the beads. Instead I used all freshwater pearls on one strand, all light gray pearls on another strand, and the middle strand has a mixture of small pearls, light gray pearls, and crystal beads to make this elegant three strand sterling silver bracelet.


Monday, March 25, 2013
National Craft Month Challenge: Day 25
Day 25 Challenge is to make chain maille. This is a very basic pattern, but I've never tried it before and it was actually a lot of fun. I used gold, silver and copper jump rings.
The chain maille pattern was easy, but joining the three long strips together could be challenging at times. Then I had to figure out how to attach this to the slide clasp I'd selected. I thought I could fill the spaces between the jump rings with crimp covers, but they wouldn't fit around the bar on the clasp. So I settled on a bunch of additional loose jump rings, just to fill the void.

The chain maille pattern was easy, but joining the three long strips together could be challenging at times. Then I had to figure out how to attach this to the slide clasp I'd selected. I thought I could fill the spaces between the jump rings with crimp covers, but they wouldn't fit around the bar on the clasp. So I settled on a bunch of additional loose jump rings, just to fill the void.

Sunday, March 24, 2013
National Craft Month Challenge: Day 24
Day 24 Challenge is to use a clasp as a focal point in your design. This is a bracelet with a beautiful vermeil Prehenite box clasp on a wedding knot gold-filled chain maille bracelet. I love the simplicity of the bracelet and how it doesn't detract from the elegant clasp.


Saturday, March 23, 2013
National Craft Month Challenge: Day 23
Day 23 Challenge was to learn an exciting new technique of your choice. This one was really hard. I lost part of the day because I had to finish the project for the Day 22 challenge. Then I couldn't decide what to try. Initially I tried to learn (or actually re-learn) making a beaded crochet rope but that was a disaster! I'm going to have to have a one-on-one lesson (again) to master that technique. So as the day wore on, I knew I had to do SOMETHING so I decided to pull out the shrink plastic that I bought awhile back. After numerous trials and errors, I finally have a pair of earrings, even though they didn't turn out very good. Oh well, at least I learned that I don't want to make shrink plastic jewelry!


National Craft Month Challenge: Day 22
Day 22 Challenge was to make a piece inspired by a film. I couldn't decide on a project until about 3pm, and by the time I had the design fixed in my mind and started working on it, other obligations kept me from finishing the same day, so this morning I started in bright and early and got it done.
My movie inspiration is a film that hasn't yet been released. Last year I had the incredible opportunity to have a very small role in the faith-based film Waiting for Butterflies that was filmed right here in Aiken. This necklace is my homage to that incredible experience. I enhanced a Vintaj butterfly with color, then added wire-wrapped fire polished crystals using copper wire.

My movie inspiration is a film that hasn't yet been released. Last year I had the incredible opportunity to have a very small role in the faith-based film Waiting for Butterflies that was filmed right here in Aiken. This necklace is my homage to that incredible experience. I enhanced a Vintaj butterfly with color, then added wire-wrapped fire polished crystals using copper wire.

Thursday, March 21, 2013
National Craft Month Challenge: Update
Earlier I wrote how I accidentally dumped out a tray of seed beads preparing for the Day 20 Challenge of woven fringe. After sorting seed beads for more hours than my neck could take, I was adviced to just keep it mixed up and make it my new favorite seed bead mix. I finally decided that was probably the easiest way to go, so I made another bangle bracelet using my "new favorite seed bead mix". Turned out very pretty, I think.


National Craft Month Challenge: Day 21
Day 21 Challenge is to create some tasty arm candy by making a stunning stacked bracelet set. I love making these funky bracelets. The color possibilities are only limited by the extent of your seed bead collection!


Wednesday, March 20, 2013
National Craft Month Challenge: Day 20
Day 20 Challenge is to welcome in Spring by doing some spring cleaning. Since I just reorganized my studio just a few weeks back, I didn't think I'd tackle that. However, yesterday we had a challenge to use one of the seed bead woven fringe techniques. Needless to say, in the process of deciding what colors of seed beads to use, I dumped an entire tray of seed beads on the floor. I'm about halfway done with sorting them :-( I'm going to need a neck massage when this is over!


Tuesday, March 19, 2013
National Craft Month Challenge: Day 19
Day 19 Challenge is to try one of Fusion Beads seed bead woven fringe techniques. I made this black square stitch bracelet and added colorful seed beads using the looped fringe technique.


Monday, March 18, 2013
National Craft Month Challenge: Day 18
Day 18 Challenge is to make a piece of jewelry using any style of chain. I had this vintage pendant with a cabochon that looks like kiwi jasper, so I added a handmade bail, kiwi jasper beads, antique silver beads and chain.

Sunday, March 17, 2013
National Craft Month Challenge: Day 17
Day 17 Challenge is to make a green jewelry piece for St. Patrick's Day.
I bought these cool earrings on sale the other day at Macy's.

I thought they would be cool with some alcohol ink in the grooves, then I lightly sanded so some of the gold would show through. Finished them off with a coat of matte acrylic sealer.

I bought these cool earrings on sale the other day at Macy's.

I thought they would be cool with some alcohol ink in the grooves, then I lightly sanded so some of the gold would show through. Finished them off with a coat of matte acrylic sealer.

Saturday, March 16, 2013
National Craft Month Challenge: Day 16
Day 16 Challenge is to use a bead that's been in your bead stash forever. I made this ceiling fan pull using a beautiful lime green and purple lampwork bead I bought several years ago.


Thursday, March 14, 2013
National Craft Month Challenge: Day 14
Day 14 Challenge is to make a piece for girl's night out with lots of sparkle and bling. I made these earrings with silver-lined fire polished crystals for just the right amount of sparkle, and they'll go with anything :-)


Wednesday, March 13, 2013
National Craft Month Challenge: Day 13
Day 13 Challenge is to use your favorite seed bead mix in a design. Well I don't really have a favorite "seed bead mix", but I have lots and lots of seed beads, all sizes, all colors, so I made this necklace and earring set using an antique brass pendant with colorful size 6 matte seed beads to go with the Pantone spring colors for spring.


Tuesday, March 12, 2013
National Craft Month Challenge: Day 12
Day 12 Challenge is to finish an unfinished beading project. I etched this pendant a year or two ago when my sister-in-law Sue was in town and taught me how to etch. I completed the pendant but never did anything with it.

I picked out some green glass teardrop beads that pick up the green ink I used to color the pendant.

Today I finished off the necklace using the green glass teardrop beads and copper chain with the pendant :-)


I picked out some green glass teardrop beads that pick up the green ink I used to color the pendant.

Today I finished off the necklace using the green glass teardrop beads and copper chain with the pendant :-)

Monday, March 11, 2013
National Craft Month Challenge: Day 11
Day 11 Challenge is to get creative and use a found object in a jewelry piece. I came across this weird pendant, don't know what it is but it looks like an alien ! Here's the before picture:

I used some alcohol ink and nail polish to add a little color, then put it on gold chain with orange/yellow beads.


I used some alcohol ink and nail polish to add a little color, then put it on gold chain with orange/yellow beads.

Subscribe to:
Posts (Atom)

